Create Approval Workflow
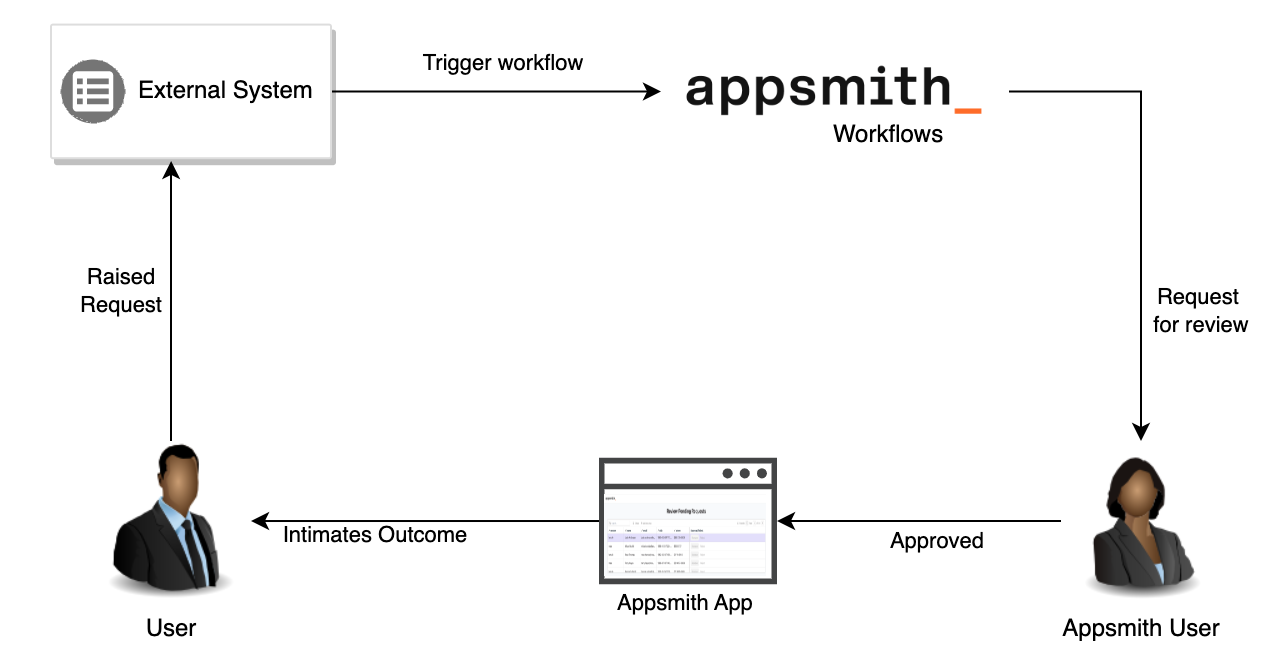
In an approval workflow, where human intervention is necessary for decision-making, you can use Appsmith workflows. This page shows how to set up an approval workflow requiring human decision-making using Appsmith workflows and the Appsmith app.
Prerequisites
Before you start, make sure you have:
- A self-hosted instance of Appsmith. Refer to the Appsmith installation guides for detailed instructions on setting up your Appsmith instance.
- Basic knowledge of creating a basic workflow in Appsmith. If you're new to Workflows, follow the Tutorial - Create Basic Workflow to learn the workflow basics.
- A configured datasource to manage data within your workspace. For more information on configuring datasource, see the available Datasources in Appsmith.
Create workflow
Follow these steps to set up a workflow within your workspace:
-
In your workspace, click Create New to create a new Workflow. To understand the basics of creating a workflow, see the Tutorial - Create Basic Workflow.
-
Click + under Queries/JS to create a query that fetches data needed for decision-making.
Example: If you are processing order refunds, fetch the order details using the following query:
 -- The order_id is a parameter, and replaced by the actual value passed by the application
SELECT * FROM public."orders" WHERE order_id = {{this.params.order_id}};
{{this.params.order_id}} is a dynamic binding in Appsmith that replaces the placeholder with an actual value at runtime.
- Create a query to update data based on user actions. After a user approves or rejects the request, the workflow must update the corresponding record in the database.
Example: To update the status of an order after approval, use the following query:
-- The order_id are parameters and replaced by the actual value passed by the application
UPDATE public."orders"
SET status = 'Refund Processed'
WHERE order_id = {{this.params.order_id}};
{{this.params.order_id}} dynamically retrieves the order_id from the workflow request.
- To send notifications, configure an SMTP datasource and create queries for email alerts.
Example: To notify a customer when a refund is approved, create two SMTP queries:
-
To notify approval (
notifyUser):- Include the following parameters:
- Customer name (
{{this.params.customer_name}}) – The user who raised the request. - Customer email (
{{this.params.customer_email}}) – The recipient of the notification.
-
To notify rejection (
notifyRejectionToUser):- Include the following parameters:
- Customer name (
{{this.params.customer_name}}) – The user who raised the request. - Customer email (
{{this.params.customer_email}}) – The recipient of the notification. - Rejection reason (
{{this.params.rejection_reason}}) – The reason for rejection.
Create & handle requests
Follow these steps to create approval requests that are awaiting user interaction:
-
In your workflow, create a new ApprovalRequest query. This query allows you to define the approval request, including the requester name, approvers (individual emails or groups), metadata, and allowed resolutions such as
ApproveorReject. -
Configure the ApprovalRequest query with the necessary details:
- Requester Name – The name of the user initiating the approval request.
- Approver(s) – Select individuals or groups who will approve or reject the request.
- Metadata – Attach relevant data such as order details or request information. For example,
{ "order": order }. - Allowed Resolutions – Define the actions approvers can take, such as "Approve" or "Reject."
- In the Main JSObject, write the code to handle approval requests by executing the ApprovalRequest query and processing the approver’s decision.
For example, in the refund processing, if the resolution value is Approve, the system processes the refund by executing the initiateRefund query and then sends an approval email to the user, notifying them that the refund has been processed. If the resolution value is Reject, the system triggers the notifyRejectionToUser query to send a rejection email, informing the user that their refund request has been denied.
export default {
    async executeWorkflow(data) {
        // Execute the approval request query
        const response = await approval_request.run();

        // Workflow is now paused, awaiting approval.
        if (response && response.resolution === "Approve") {
            console.log("Request Approved");
            await initiateRefund.run({
                "id": data.order_id,
                "status": "Refund Processed"
            });
            await notifyUser.run({
                "customer_email": data.customer_email,
                "customer_name": data.customer_name
            });
        } else if (response && response.resolution === "Reject") {
            console.log("Request Rejected");
            await notifyRejectionToUser.run({
                "customer_email": data.customer_email,
                "customer_name": data.customer_name,
                "rejection_reason": data.rejection_reason
            });
        }

        return true;
    }
}
-
Click the Deploy button. After deployment, a modal appears prompting you to Configure Approval Requests. Select an application within this workspace to handle approval queries from this workflow.
-
Click the Generate New Page button. This automatically creates a new page within the selected application, preconfigured with a Table widget and the necessary queries to retrieve and resolve approval requests.
-
Go to the application where the new page was generated and open it. In this new page, three queries are automatically created:
getPendingRequests– Fetches pending approval requests.getResolvedRequests– Retrieves previously resolved requests.resolveRequest– Processes user actions when a request is approved or rejected.
The Table widget is preconfigured and connected to the getPendingRequests query, displaying pending approval requests. You can click on the Resolve button to approve or reject the requests.
When you click Approve, the resolveRequest query is triggered, passing the request ID and resolution action to the workflow. When you click Reject, the resolveRequest query runs with the rejection action. If required, a rejection reason can be provided.
- Deploy your application to test approval and rejection actions. Users can now interact with approval requests, take necessary actions, and see updates in real time.
Troubleshooting
If you face issues, contact the support team using the chat widget at the bottom right of this page.
See also
- Debug Workflow - Learn to debug workflows as you build them.
- Pass Parameters to Workflows - Learn how to pass parameters to workflows from the Appsmith app or external systems.
- Workflow Functions - Explore the variety of functions available for your workflows.